1. Introduction
Amazon Web Services (AWS) provides a powerful and flexible Identity and Access Management (IAM) service that enables fine-grained control over access to your AWS resources. A fundamental concept within IAM is role assumption, a key mechanism for delegating permissions securely and efficiently. In this technical project, we’ll dive into the process of assuming roles in AWS, offering a detailed, hands-on guide to help you gain a strong understanding of this essential security practice.

2. Prerequisites
Before exploring the process of assuming roles in AWS, make sure the following prerequisites are in place:
-
AWS Account: You’ll need an active AWS account to access both the AWS Management Console and the AWS Command Line Interface (CLI).
-
IAM Permissions: Ensure you have the necessary IAM permissions to create, modify, and assume roles.
-
AWS CLI (Optional but Recommended): While most tasks can be completed via the AWS Management Console, having the AWS CLI installed and properly configured allows for greater flexibility and automation.
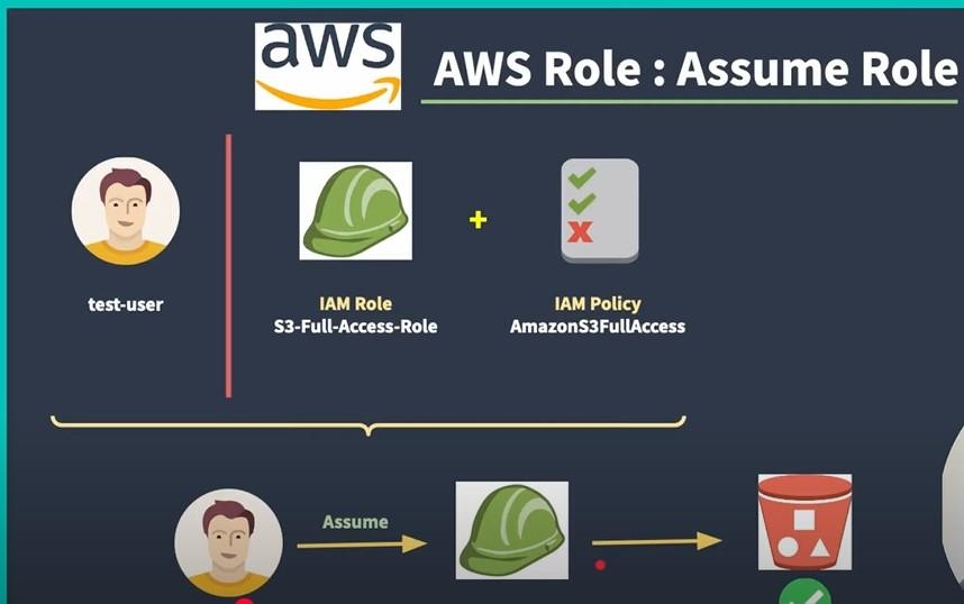
3. Understanding IAM Roles
AWS IAM roles are intended to be assumed by AWS services, resources, or external Identity Providers. Roles enable you to grant specific permissions to trusted entities without the need to expose long-term credentials like access keys. Here are the key points to understand about IAM roles:
-
Roles are defined by policies: IAM roles are linked to policies that specify what actions the entity assuming the role is authorized to perform. For example, an IAM role with an S3 policy allows specific actions on S3 buckets or objects, such as uploading or retrieving data.
-
Temporary credentials: When a role is assumed, it issues temporary security credentials that can be used to access AWS resources, like S3 buckets, based on the permissions defined in the associated policy.
-
Trust policy: Each role has a trust policy that dictates which entities are permitted to assume the role. This could include AWS services like EC2 instances or even external accounts, allowing controlled access to resources like S3.
4. Creating an IAM Role with a Trust Policy
To begin, sign in to the AWS Management Console and navigate to the IAM console. As part of the process, I will first create a new user account to refresh my skills and ensure a solid understanding of the foundational steps. Afterward, I will proceed to create the IAM role with the trust policy.

5. After entering the username, simply click "Next" since no further configuration is required for this step. In this case, I have created the user with the name "test-user."

6. Great! You can now see the new user that i have created.

7. Next, we’ll click on the new user, then enable console access. At this stage, we’ll also need to create the user’s credentials, specifically the password. There is also an option to auto-generate the password if preferred.

8. After completing the previous steps, you will see a pop-up with the login credentials. Make sure to copy this information to a notepad or another secure location, as you will need it to sign in to the new user account "test-user."

9. Next, we’ll sign in to the "test-user" account.

10. I have successfully logged into the "test-user" account, and we can see that the user has no permissions assigned.

11. Back to the root user, in the navigation pane, select "Roles" and then click "Create role."

12. Choose “AWS account” as the trusted entity type. Be careful at this step, as you are creating a role for all users.

13. At this step, you can choose which account you want to use if you wish to assume the role using a different root account. However, for me, I used my parent root account, which is the default ,then click next.

14. now you have to filter at this case i am creating s3-access , as seen below then click s3FullAccess

15. Next, you will be directed to the dashboard. Edit the name of the role you're creating. For me, I used "s3-Full-Access."

16. Great! We have now successfully created the role, and we can see it added to our roles list.

17. Next, we’ll create a policy. Navigate to Users, then click on "test-user." Under Add permissions, click Create inline policy.

18. I used JSON to edit my policy.

19. And I have successfully created the policy.

20. We can now see that the "test-user" has been assigned the policy "s3-Full-Access-Policy."

21. Navigate to Roles and click on the role that we created. You’ll see a link to switch roles in the console. Copy this link and paste it into an incognito browser window where you have signed in as "test-user."

22. After loading that link this is the dashboard you will have ,you can write the display- name or leave it its optional

23. Hurray! We have successfully assumed the role for our "test-user." Now, the user can access the S3 bucket.

24. To switch back to your normal user, simply click on the user icon at the top, which will open a pop-out, then click Switch back.

25.
Conclusion
In this demo, I successfully created an IAM user, role, and policy, then assigned the appropriate permissions. I also demonstrated how to assume the role to access an S3 bucket. This process showcases the flexibility and security of AWS IAM in managing user access and delegating permissions.